Wednesday, 13 August 2014

Sunset NE Track is down

Yes, I have installed all of the track. I made a simple mistake in my use of Woodland Scenic Track Foam. I drew the track out on the board roughly and then installed the track foam using the actual track to set the position. The trouble is that I didn't get everything quite right so the actual track isn't centred on the foam centrally everywhere. I am sure that with some judicious cutting and filling I can sort this. It is going to be covered by ballast anyway so it won't matter in the long run. I have run a caboose all over and can't find any point where there is a tricky bit of track so maybe it will run fine.

I then took a series of photos of the track from up on high and drew the track plan over it using Adobe Illustrator. This means that my plan is exactly like the real thing!

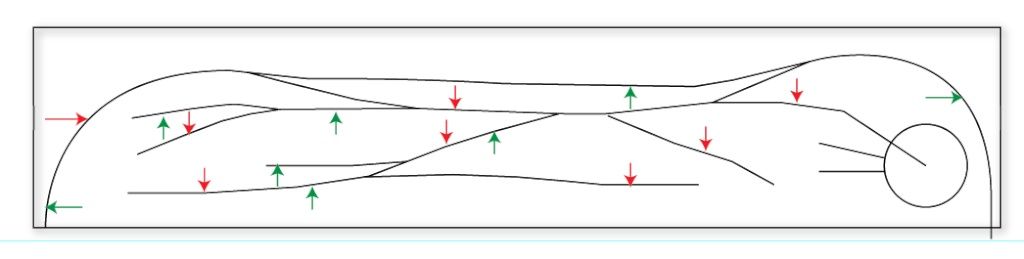
Next, I put arrows on the plan to decide on the track feeds for DCC. Tomorrow, I have most of the day to start putting in the electrics. Although it looks like a long board it is made up of 4' sections that haven't been fixed yet. There are no points on the board intersections and any track that crosses the board edges has been limited to about 6" long and is currently only held in place by the rail joiners (fishplates, we call them). This means that I can now take each board down and turn it over to install the track bus. My arthritis doesn't allow me to prance around under the boards!

I love this bit as I feel that I am so close to a running railroad but not quite so the expectations are very high. I will post again when I have the track bus completed and a loco running.

I am awaiting a parcel from Model Train Stuff that has another 2-6-0 DCC Sound loco, 20 freight cars including a good many Accurail kits and a pack of replacement Kadee couplers so I will have a lot of fun getting that all working. I am also about to order a Heljan DCC driven turntable!

Here is the current track plan with suggested feeders.
Tuesday, 12 August 2014

All Change - Again!! Back to US HO

Whilst my visit to 009 was informative and fun, it turned out to be rather too much scratch building for me. Although I like making US freight car kits - the body tends to come in one piece - I got a bit fed up with making short run plastic kits from basic components for every wagon that I wanted to run. Each kit was so basic that I needed a mirror to build the body on so that I could ensure that it was square.

Recently, my mother-in-law has moved into the same apartment block as us. She used to live 10 miles away and used to stay overnight at least once a week. Now she is in the same block, we can dispense with the spare bed and I can get my hobby room back to my total ownership again.

I am building a new incarnation of my old favourite - the Sunset and North Eastern. This is a freelance road name that I have used since the 1960s. It is supposedly a short line in New England in the 1950s and still using the old 2-6-0 Moguls it has always had.

So far, I have built the baseboard and laid the foam track bed (never used that before). I am currently laying the track. It will, as usual, be DCC but I am staying with manual point operation (big finger from sky) as I have never got on with remembering all of the switch numbers to use DCC with them. The two locos that I have are both Bachmann with DCC and Sound fitted. Since fitting sound to my little 009 locos, I want to stay with that. I like the idea of ringing bells and blowing whistles at grade crossings.

I only have two photos so far. Please note that, for you USA types, wood is quite expensive in the UK hence the spindly legs but the layout is supported on three sides by walls so it won't be a problem.


Sunday, 27 October 2013

ExpoNG 2013 at Swanley

ExpoNG is an exhibition put on by the Greenwich and District Narrow Gauge Railway Society which took place on 26th October at the White Oak Leisure Centre in Swanley. If you didn't get there - it was a fantastic exhibition with so many layouts there for our delight and education. I took around 75 shots and have put them together into a slide show rather than dump them all on here.

Firstly, a little bit of an apology. Skip this if you are not interested in either photography or my problems - grin. I regularly take the photos at our local plastic model club - IPMS Clacton - and have honed my photographic methods to enhance the depth of field in the images so that all of the photo is in focus. This is not something that most digital camera do as they generally make the setting for the best exposure and not for depth of field. If you are interested in cameras, I am using a Canon 700D digital SLR with a Tamron 18-200 lens attached. Normally, at the club, I use a tripod and have all the time in the world to get it right. I didn't have those luxuries yesterday. What I do is set the camera to manual (I know - it sounds like in an aircraft - Doors to Manual!). I then set the aperture to F18 to start and set the shutter to 1/40th. That was the general setting but I had to adjust on some photos depending on what I was taking. As I didn't have the luxury of unlimited time,I had to judge from the on-board display and hence the images are just a little under exposed. Note that I couldn't reduce the exposure too much as that would have brought camera shake into the equation. However, the depth of field is OK so I am reasonably happy. Where the only image I have is slightly out of focus, I have included it for completeness.

OK here goes. I have created two sets of shows. One uses Adobe Flash so cannot be displayed on any Apple iPhones or iPads. Hence, I have made a second set using standard HTML. This should work on any device.

Flash - http://www.totallyobjects.com/ng/flash/index.html

Standard HTML - http://www.totallyobjects.com/ng/html/index.html

Thursday, 24 October 2013

The Engine Shed is complete

I have finished the Engine Shed and have "placed" it on the layout. I still have to weather it and set it into the ground.


I am going to lay the ground with cinders and bed the building it with some grass around the edges etc. It is amazing how much work is involved in a single building.

Wednesday, 23 October 2013

Bhynsell is now working nicely

I now have all of the track down and have started to do a bit of scenic work. I have also been making a few wagons plus finishing off the two locos that I have bought.


As you can see we have a complete round-roundy layout with a nice little station and a raised branch area. What you can't see is that there is a small station off to the left which will be hiding the fiddle yard. 

The engine shed is currently under instruction and you can see the Kitwood Hills Models 90mm turntable in place.  The turntable is fully powered and is controlled by a DCC decoder that will run it extremely slowly. Underneath is a Tam Valley Frog Juicer that fixes the inevitable short that arises when the turntable is turned through 90 degrees.

I have two nice little locos - both from Chris Ward. I have named one after my wife, Valerie and one after Valerie's pet dog Henry.


Val (the blue one) is absolutely loaded up with liquid lead and can manage most trains that I give it. However, Henry (the green one) has the little Kato bogie chassis and, in spite of putting liquid lead in every available space, it is not able to pull much at all. I think that I will have to double head it most of the time. I am going to ExpoNG at Swanley this weekend so I will probably do something there.

The most recent activity has been two fold. Firstly, I have been fitting out the new Peco Lynton and Barnstaple coaches, that I bought at Kegworth, with Microtrains couplers so that I can pull them with my locos. This is what they look like in a train now.


Secondly, I have been ballasting and fitting out the Engine Shed. You can see the coal stage and the Water Crane in the image above. I have also been scratch building an engine shed which is partially finished.


This is constructed with a shell of 3mm foam board covered with Scalescenes random ashlar sheets. I am in the process of fitting the roof and there are still the windows to go in - my order for inkjet printable clear sheets has yet to arrive!

Lastly, I have fitted two sound chips into the baseboard. These are Digitrax units and have the same DCC addresses as the two locos. This means that when I select one of the locos, I also select the relevant sound chip and they both work together. It is an easy way to put sound into these little locos. 

This is what it comes out like - this is a video of Val and henry in a consist (latched together so that they operate as a single unit) with both sound chips in play and the L&B coaches in tow.


Sunday, 22 September 2013

The main station track is laid

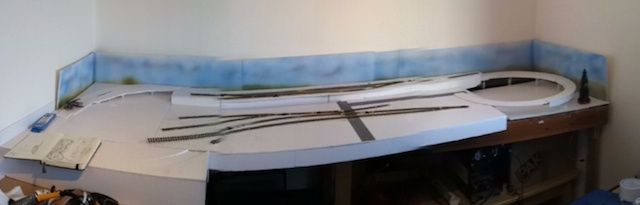
Here is what it looks like at the moment. Please note that this is a panorama shot taken with my phone. The back scene is straight - not curved as shown.


Before I can fix the main station board into place, I have to make and install the turntable that is going on the right (not in the depression, just on the end of the raised station board, if you see what I mean).


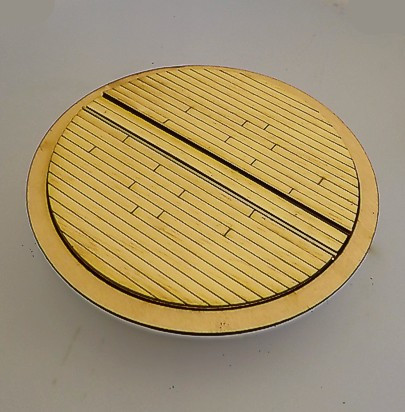
The turntable is a wooden, laser cut, one provided by Kitwood Hill Models.


It comes with a nice little gear train to power it. I have a decoder to control it and an auto reverse module to manage the flip in electrical polarity when the turntable turns around.

Tuesday, 17 September 2013

So - all change - again!!!!


OK, so all change! I have finally worked out, one year after retiring, that I am actually retired! It took that long to sink in. Mind you I still do some programming for a company in the USA so I am not completely idle. So, what has this to do with the price of fish? It has caused me to reconsider that I was doing with my model railways and what I wanted to spend the next year or so doing. I have no great affinity for any British railway, having grown up in South London with a railway embankment down the end of the road that only ever had Southern electric mus on it. As noted in my profile, I have done mostly US outline since 10 years old. Hence, the supposedly LNER/BR railway I was building was poorly designed and didn't grab my imagination. I was also trying to put my new NG railway onto a 72" x 18" board and it wasn't going where I wanted it anyway. So the OO railway has come up and is being replaced with the NG layout. This means that I have 8' x 2'+ whatever to play with. I can now have the roundy roundy that I wanted as I do like to see trains run and with sound on the railway, this would enhance the effect enormously.

I have spent a lot of time over the last week trying to fit the previous plan into my round/roundy but finally decided to rip up all the track in the main station and relay it to a new design. One of the nice things about using foam board is how quickly you can reconfigure. I just slapped two new sheets of foam board over the station area and - bingo - I have a nice clean working area.

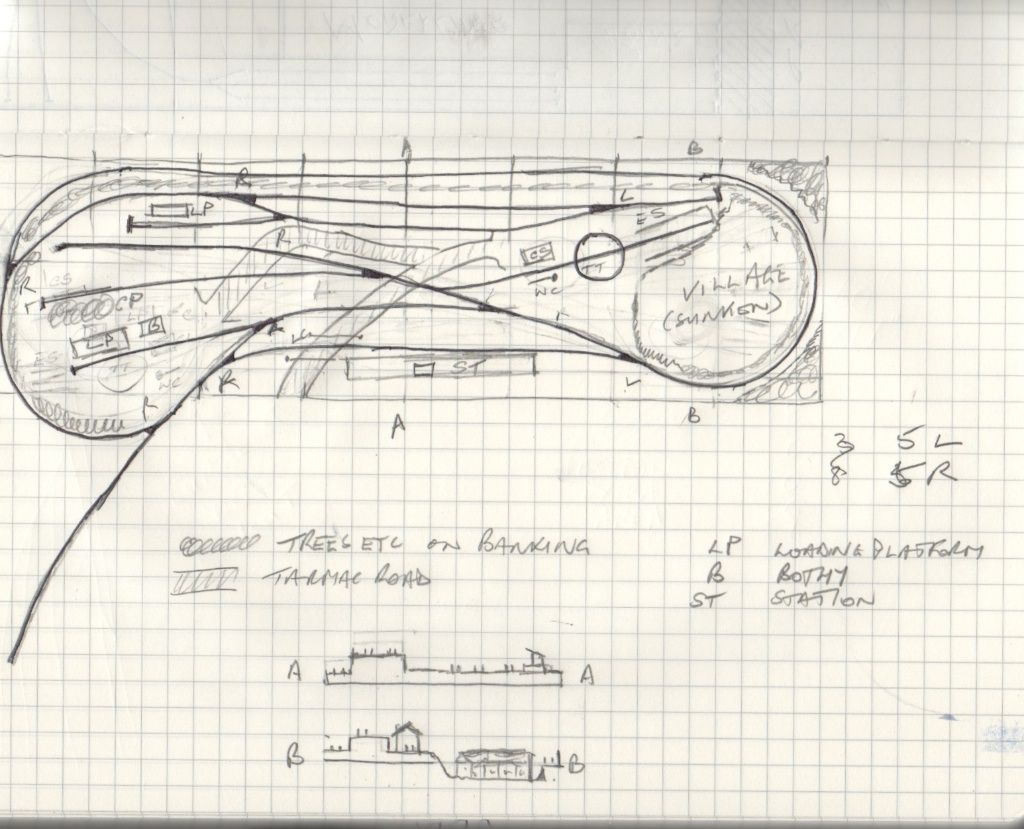
Here is what I plan to do - well actually, I am in the middle of doing it!

bhynsell034_zpsf0331add.jpg

I am coming to the NG Conference on the Saturday so  if you have anything to comment, collar me there. If you see a white haired, white bearded copy of Father Christmas or Papa Smurf, that's me. I hope to meet as many people as possible. Plus, I have a full pocket of cash so I am looking forward to it. See you there.