ExpoNG is an exhibition put on by the Greenwich and District Narrow Gauge Railway Society which took place on 26th October at the White Oak Leisure Centre in Swanley. If you didn't get there - it was a fantastic exhibition with so many layouts there for our delight and education. I took around 75 shots and have put them together into a slide show rather than dump them all on here.
Firstly, a little bit of an apology. Skip this if you are not interested in either photography or my problems - grin. I regularly take the photos at our local plastic model club - IPMS Clacton - and have honed my photographic methods to enhance the depth of field in the images so that all of the photo is in focus. This is not something that most digital camera do as they generally make the setting for the best exposure and not for depth of field. If you are interested in cameras, I am using a Canon 700D digital SLR with a Tamron 18-200 lens attached. Normally, at the club, I use a tripod and have all the time in the world to get it right. I didn't have those luxuries yesterday. What I do is set the camera to manual (I know - it sounds like in an aircraft - Doors to Manual!). I then set the aperture to F18 to start and set the shutter to 1/40th. That was the general setting but I had to adjust on some photos depending on what I was taking. As I didn't have the luxury of unlimited time,I had to judge from the on-board display and hence the images are just a little under exposed. Note that I couldn't reduce the exposure too much as that would have brought camera shake into the equation. However, the depth of field is OK so I am reasonably happy. Where the only image I have is slightly out of focus, I have included it for completeness.
OK here goes. I have created two sets of shows. One uses Adobe Flash so cannot be displayed on any Apple iPhones or iPads. Hence, I have made a second set using standard HTML. This should work on any device.
Flash - http://www.totallyobjects.com/ng/flash/index.html
Standard HTML - http://www.totallyobjects.com/ng/html/index.html
Sunday, 27 October 2013
Thursday, 24 October 2013
The Engine Shed is complete
I have finished the Engine Shed and have "placed" it on the layout. I still have to weather it and set it into the ground.

I am going to lay the ground with cinders and bed the building it with some grass around the edges etc. It is amazing how much work is involved in a single building.
I am going to lay the ground with cinders and bed the building it with some grass around the edges etc. It is amazing how much work is involved in a single building.
Wednesday, 23 October 2013
Bhynsell is now working nicely
I now have all of the track down and have started to do a bit of scenic work. I have also been making a few wagons plus finishing off the two locos that I have bought.
.jpg)
.jpg)


.jpg)
.jpg)
As you can see we have a complete round-roundy layout with a nice little station and a raised branch area. What you can't see is that there is a small station off to the left which will be hiding the fiddle yard.
The engine shed is currently under instruction and you can see the Kitwood Hills Models 90mm turntable in place. The turntable is fully powered and is controlled by a DCC decoder that will run it extremely slowly. Underneath is a Tam Valley Frog Juicer that fixes the inevitable short that arises when the turntable is turned through 90 degrees.
I have two nice little locos - both from Chris Ward. I have named one after my wife, Valerie and one after Valerie's pet dog Henry.


Val (the blue one) is absolutely loaded up with liquid lead and can manage most trains that I give it. However, Henry (the green one) has the little Kato bogie chassis and, in spite of putting liquid lead in every available space, it is not able to pull much at all. I think that I will have to double head it most of the time. I am going to ExpoNG at Swanley this weekend so I will probably do something there.
The most recent activity has been two fold. Firstly, I have been fitting out the new Peco Lynton and Barnstaple coaches, that I bought at Kegworth, with Microtrains couplers so that I can pull them with my locos. This is what they look like in a train now.

Secondly, I have been ballasting and fitting out the Engine Shed. You can see the coal stage and the Water Crane in the image above. I have also been scratch building an engine shed which is partially finished.

This is constructed with a shell of 3mm foam board covered with Scalescenes random ashlar sheets. I am in the process of fitting the roof and there are still the windows to go in - my order for inkjet printable clear sheets has yet to arrive!
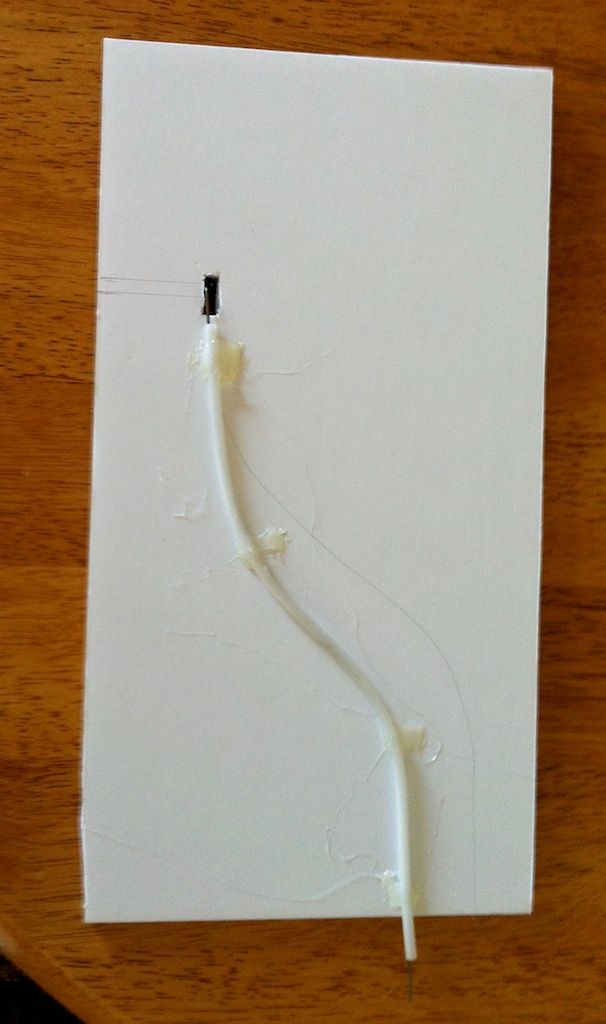
Lastly, I have fitted two sound chips into the baseboard. These are Digitrax units and have the same DCC addresses as the two locos. This means that when I select one of the locos, I also select the relevant sound chip and they both work together. It is an easy way to put sound into these little locos.
This is what it comes out like - this is a video of Val and henry in a consist (latched together so that they operate as a single unit) with both sound chips in play and the L&B coaches in tow.
Sunday, 22 September 2013
The main station track is laid
Here is what it looks like at the moment. Please note that this is a panorama shot taken with my phone. The back scene is straight - not curved as shown.
The turntable is a wooden, laser cut, one provided by Kitwood Hill Models.
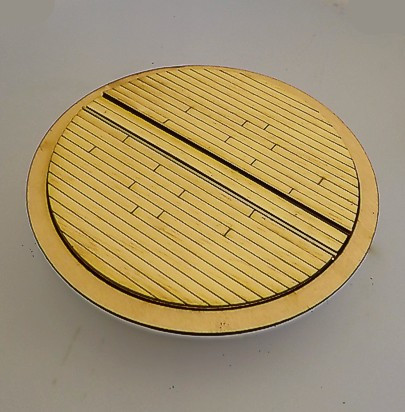
Before I can fix the main station board into place, I have to make and install the turntable that is going on the right (not in the depression, just on the end of the raised station board, if you see what I mean).
It comes with a nice little gear train to power it. I have a decoder to control it and an auto reverse module to manage the flip in electrical polarity when the turntable turns around.
Tuesday, 17 September 2013
So - all change - again!!!!
OK, so all change! I have finally worked out, one year after retiring, that I am actually retired! It took that long to sink in. Mind you I still do some programming for a company in the USA so I am not completely idle. So, what has this to do with the price of fish? It has caused me to reconsider that I was doing with my model railways and what I wanted to spend the next year or so doing. I have no great affinity for any British railway, having grown up in South London with a railway embankment down the end of the road that only ever had Southern electric mus on it. As noted in my profile, I have done mostly US outline since 10 years old. Hence, the supposedly LNER/BR railway I was building was poorly designed and didn't grab my imagination. I was also trying to put my new NG railway onto a 72" x 18" board and it wasn't going where I wanted it anyway. So the OO railway has come up and is being replaced with the NG layout. This means that I have 8' x 2'+ whatever to play with. I can now have the roundy roundy that I wanted as I do like to see trains run and with sound on the railway, this would enhance the effect enormously.
I have spent a lot of time over the last week trying to fit the previous plan into my round/roundy but finally decided to rip up all the track in the main station and relay it to a new design. One of the nice things about using foam board is how quickly you can reconfigure. I just slapped two new sheets of foam board over the station area and - bingo - I have a nice clean working area.
Here is what I plan to do - well actually, I am in the middle of doing it!
I am coming to the NG Conference on the Saturday so if you have anything to comment, collar me there. If you see a white haired, white bearded copy of Father Christmas or Papa Smurf, that's me. I hope to meet as many people as possible. Plus, I have a full pocket of cash so I am looking forward to it. See you there.
Wednesday, 28 August 2013
Point operation test bed
Those of you that have been following my progress on my new OO9 layout here:
http://gentlemr.blogspot.co.uk/2013/08/starting-build.html
know that I am building it on a B&Q door covered in 5mm foam board.
The issues that I now have involve fixing the track and operating the points. My intention is to use double side tape ( using the trade type I get from my local Toolstation ) and to use tube-and-wire for the main station points.
To make sure that everything was going to work, I made a small prototype. Firstly, here is the top side with the point fixed using the tape.
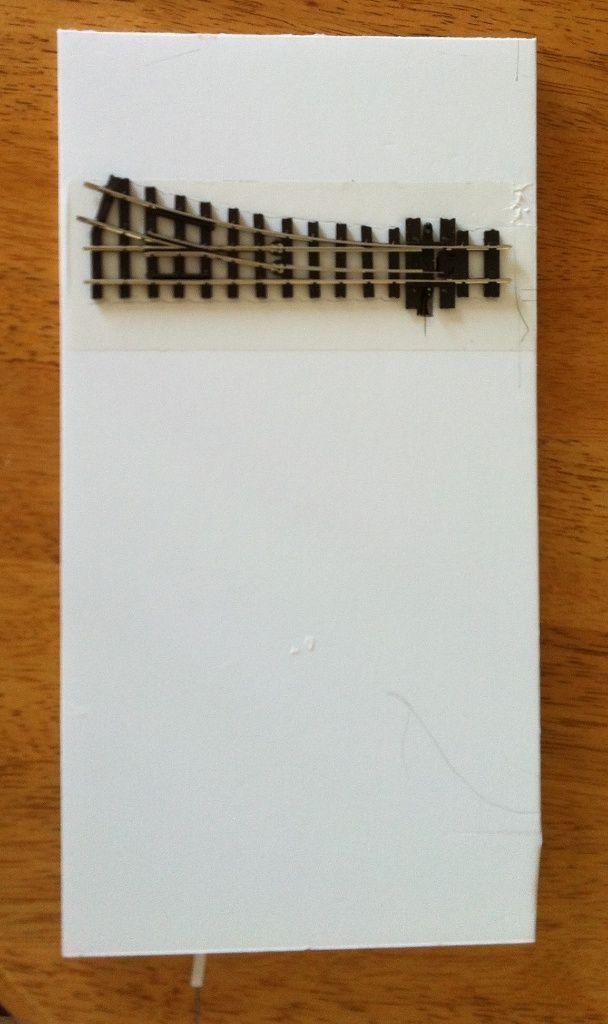
The next photo shows the tube fixed down with hot glue to the foam board and the wire inserted. The tube and the wire came from our "local" model aircraft shop - A1 Models in Colchester since Galaxy Models closed in Ipswich!
The tube is very stiff so I had to immerse it in boiling water to get it to bend. The wire is very tough and I had a bit of a job cutting it - I only had my sprue cutter available at the time, which is designed for cutting plastic parts of their sprues - not the most heavy weight tool.
It all works very well. I am now going to leave it overnight to see how the glue fares. I will also give the point as many changes as I can as the day goes along to see if that makes anything come adrift.
I will report on progress.
http://gentlemr.blogspot.co.uk/2013/08/starting-build.html
know that I am building it on a B&Q door covered in 5mm foam board.
The issues that I now have involve fixing the track and operating the points. My intention is to use double side tape ( using the trade type I get from my local Toolstation ) and to use tube-and-wire for the main station points.
To make sure that everything was going to work, I made a small prototype. Firstly, here is the top side with the point fixed using the tape.
The next photo shows the tube fixed down with hot glue to the foam board and the wire inserted. The tube and the wire came from our "local" model aircraft shop - A1 Models in Colchester since Galaxy Models closed in Ipswich!
The tube is very stiff so I had to immerse it in boiling water to get it to bend. The wire is very tough and I had a bit of a job cutting it - I only had my sprue cutter available at the time, which is designed for cutting plastic parts of their sprues - not the most heavy weight tool.
It all works very well. I am now going to leave it overnight to see how the glue fares. I will also give the point as many changes as I can as the day goes along to see if that makes anything come adrift.
I will report on progress.
Monday, 26 August 2013
Starting the build
I have decided to go with the plan that I ended up with last week.
This is what I have done.
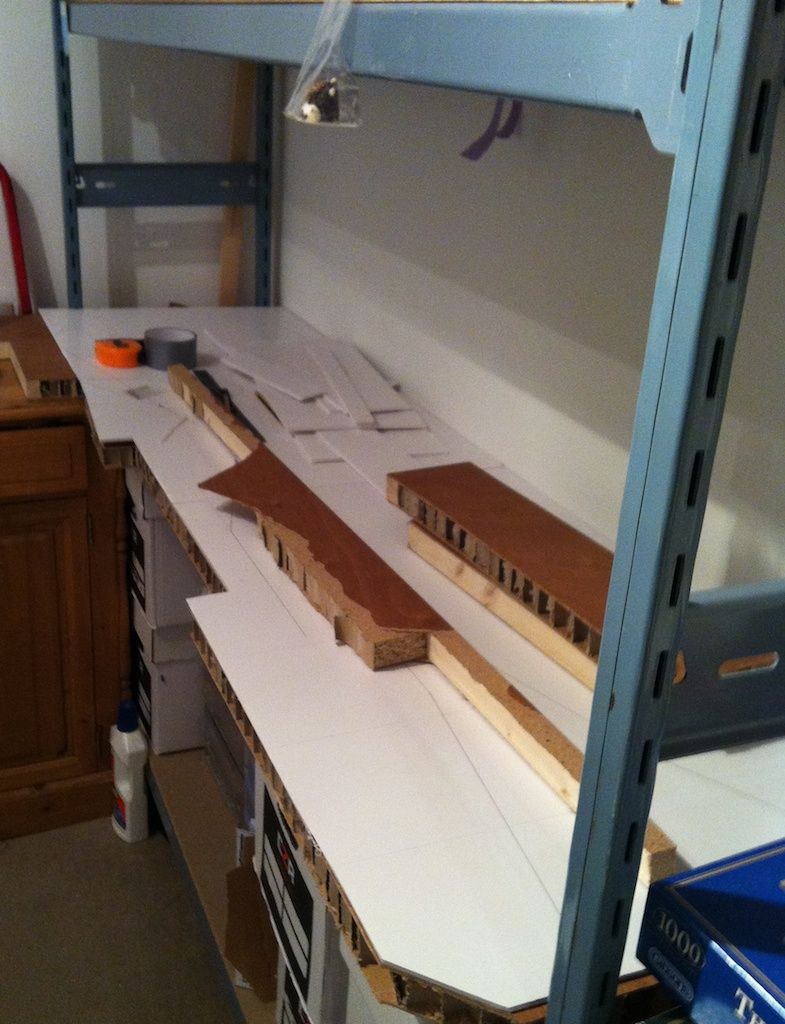
I am building the layout on a 6' x 18" shelf. The main base is a B&Q panel door. I have cut it to size to fit the space I have and carved out the docks I wanted. I have also cut it around the cabinet which abuts it on the left hand end. Then I have cut out a foam board primary base on which I am going to lay the track. What you see in this photo is the foam board cut to fit and with the layout plan drawn out on it.
The layout is very straight against the front of the board but what the drawing does is give me the space available around the track and checks whether everything is going to fit. When I actually lay the track, I will relay everything so that nothing is parallel to the board edges and all the angles become smooth curves. The foam board gets cut along the track to enable me to lay out the gradients so what you see is like a drawing rather then the real thing.
The foam board is going to be reinforced underneath to stop it warping. This will be done with more foam board that will be hot glued into place as a complex framework.
I intend that the points in the main station (to the front) will be operated by wire whilst the points on the raised slate quarry at the back will be operated by point motors fitted with DCC decoders.
Here is the board fully laid out.
This is where it will be living one it is all sorted out.
Monday, 19 August 2013
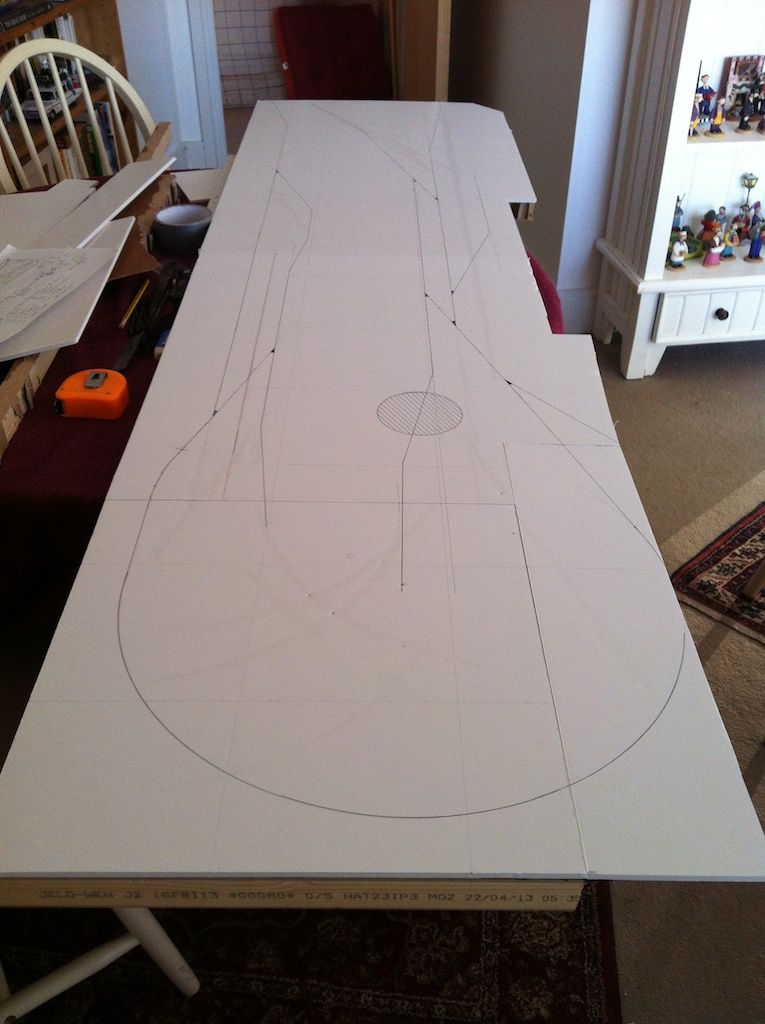
Bhynsell gets a plan
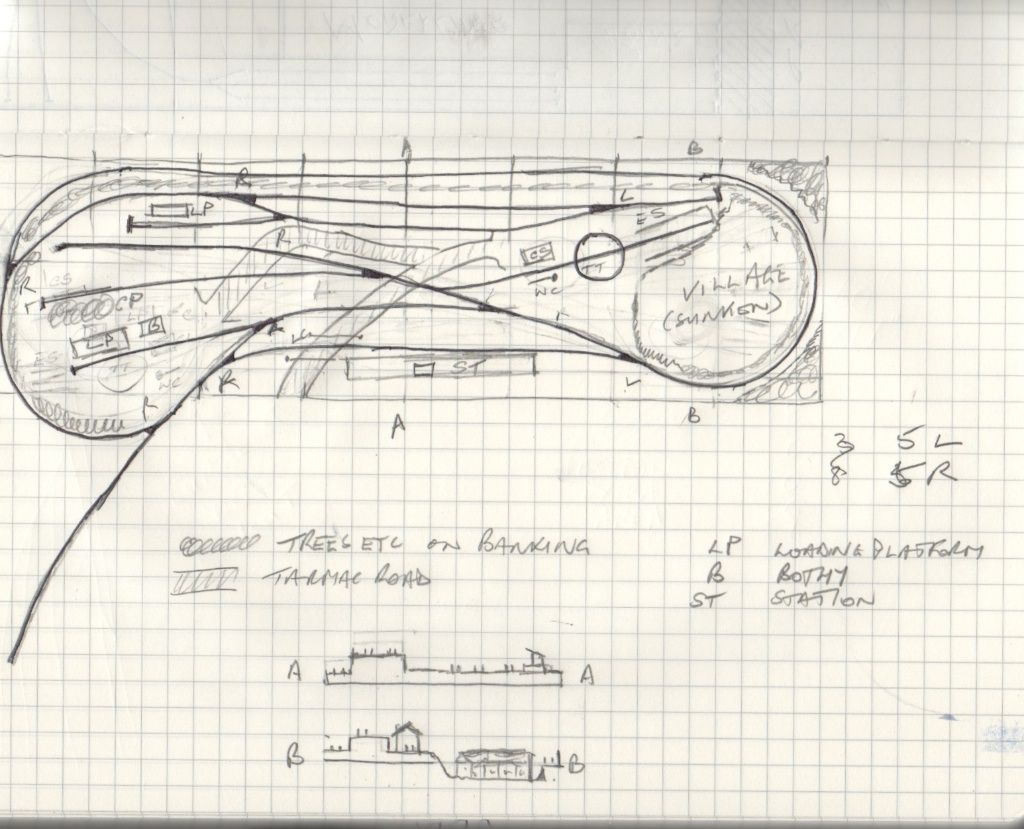
I have tweaked the plan that I came up with before. I have expanded the width of the board just a little and enlarged the fiddle yard area so that I can get a better radius on the main curve. I was playing around with the idea of getting a round-roundy bit around the back but it was all getting a bit tight and a bit complicated. I don't want to give up on this because it is a complex project.
Right,so this is what I came up with.
Basically, it is a small terminus that connects to the outside world via the fiddle yard. It also has a small branch running off to the back to a slate quarry. Behind the station and behind the slate quarry will be vertical slate walls. The quarry is planned to be just 2" above the baseboard level. I have included a little siding in the quarry for other supplies to be taken. There will be room for two trains of 5 slate wagons (the PD 3 tonners). These will be taken up and down the hill without a brake van but when shifted out on the main line(?) they will be combined with other goods wagons and a guards van. I am also having a two coach passenger train to go in and out of the FY on an occasional basis. There will also be a workers morning and afternoon train to and from the quarry.
In addition, there is a quayside where fishing boats dock. The track there will be sunk into the cobble sets to make a roadside (a bit like Poole Harbour but not so big - grin).
I know that the gradient is a bit steep but my Chris Ward loco is well weighted and I have tested it with five slate wagons up a 1:24 - 4%-ish slope and it works for me. I will double test when laying the track so I don't get caught out.
I have been reading too many Iain Rice books as I have had a go at colouring up the plan with watercolours to get a better feel for what it will look like.
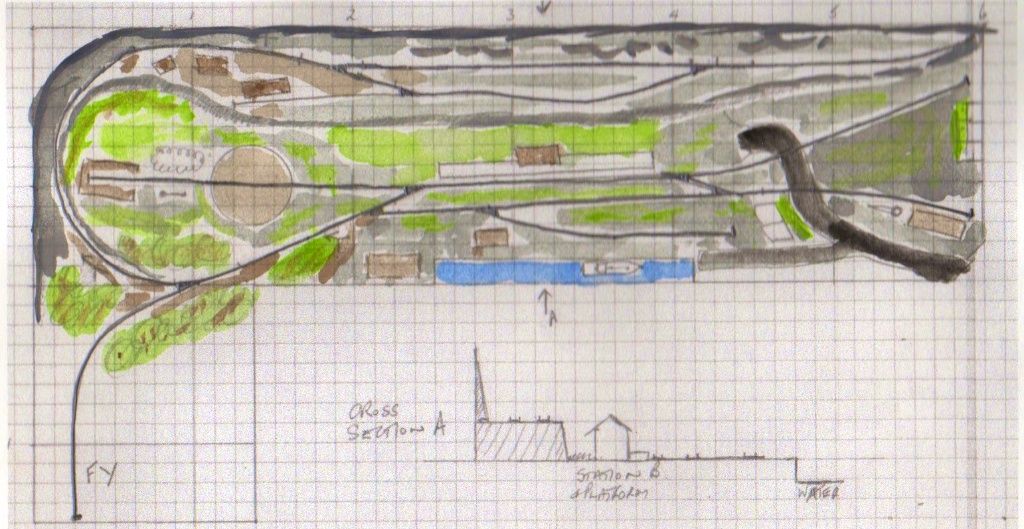
The run-around at the quarry is purposely "wonky". Having started a discussion about turntables, I decided that I like them so I have included a 90mm one. Whether this is the nice Kitwood Hill one or one that I make myself, I am not sure. I think it depends on how much the Kitwood Hill kit is as no price is mentioned on the web site.
Friday, 16 August 2013
My little Prince has sound
This is an experiment. As you will have seen in a previous post, I have put a decoder into my little CW Prince loco and it works fine. I have now got hold of a Digitrax SDH164D sound decoder from my good friend Kevin at Coastal DCC. He has loaded it with a custom sound file (the standard steam sound is for a US switcher). The one he has loaded up is
Loco Model BR#5526 "Light Prarie Tank" 2-6-2 engine Scheme
I know that this isn't correct but it is the closest I could get. I have set up the sound decoder and the loco as a consist. This is purely for test purposes at the moment but if it works out I will be putting the sound decoder and the speaker in a box up in the light arch so we should get a non-directional sound. Given my little Prince, this is probably as good as it gets!
I think that I might have to put a dummy motor load onto the sound chip to get it to work completely correctly but I will speak to my DCC guru abut that. I know that, without a motor load, it is not possible to read back any CV. More on this when I know myself.
Let me know what you think. Please remember that I have had this sound chip about 10 minutes so I have yet to get fully to grips with it.
Tuesday, 13 August 2013
Chris Ward Loco and wagons
As mentioned in the previous post, I have built a little Chris Ward loco and 5 Parkside Dundas 3 ton slate wagons. Here are some photos. Now I have a close up photo of the loco, I can see that I didn't do too good a job of smoothing out the little ridges that come with 3D printing. Never mind, I can always strip the paint off and do a better job. Mind you, I might leave that for now whilst I get the layout on the move. Note that the base board is an internal door cut up. This gives me a very light board that is structurally strong. More shots as I move along.
.jpg)

BTW, the loco will be named for my great wife - Valerie (who hates being called Val but that is all there is room for). I have ordered a set of brass name plates but they may take some time to come.
The wagons have been coupled by fitting dumb buffers to each end, fixing a wire across those at one end and the fitting a static hook on the other end. I have used a spare wire from the Chris Ward tender to attach them to the loco. I do have some Greenwich couplers coming so I will see how they go.
.jpg)

You can click on each photo to see a larger version.
BTW, the loco will be named for my great wife - Valerie (who hates being called Val but that is all there is room for). I have ordered a set of brass name plates but they may take some time to come.
The wagons have been coupled by fitting dumb buffers to each end, fixing a wire across those at one end and the fitting a static hook on the other end. I have used a spare wire from the Chris Ward tender to attach them to the loco. I do have some Greenwich couplers coming so I will see how they go.
Moving on with OO9
I am having a great time with this OO9 malarkey. I bought a couple of yards of Peco crazy track, a Chris Ward "Prince" loco kit and a pack of 5 Parkside Dundas 3 ton slate wagons from the OO9 Society. The loco needed some flattening out as the 3D printing process leaves little ridges. The little wagons were intricate but I managed to get them together. I filled up a lot of the loco and its tender with DeLuxe Materials Liquid Lead. I also put some on the underside of each wagon, making sure that I left room around the wheels.
As I am a committed DCC man, I fitted a decoder. I was going to get one of the tiny ones (at £30 each) but found out that there was tons of room inside the loco so I fitted a standard size Gaugemaster one which I had lying around. After painting everything up, I decided on a test to see what sort of gradient that the loco could manage with the 5 wagons behind.
Here is the result.
Friday, 2 August 2013
My Hobby Room
I have drawn this up so that I can discuss my proposed OO9 layout on the Narrow Gauge Online Forums. You can follow the discussion HERE.
This is the layout of the Hobby Room with the marked proposed extension.
 More after I come back from the Southwold Model Railway Show on Saturday
This is the layout of the Hobby Room with the marked proposed extension.

Tuesday, 16 July 2013
Getting the engine facilities tidy
I have spent the last week working on the goods yard and engine shed. The whole area is now covered in cinders and the facilities are now in place, as you can see.

Here is a close up of the Water crane, the coaling station and the coal staithes.
.jpg)

Here is a close up of the Water crane, the coaling station and the coal staithes.
.jpg)
Someday, I am going to have to put a nice facia board along the front there.
As you can see, the retaining wall is all in place. To remind you, this was all scratch built from some foam board, plastic embossed card, a lot of glue and time. My next job is to extend the retaining wall with a wooden fence. This will come further along and then turn right and come across to the main track to provide an entrance to the yard. Lots of use for the stirring sticks that i get from Isaac's down on the Waterfront!
Wednesday, 3 July 2013
The ballast is down and buildings are going up
I have laid all of the ballast - I used a fairly light coloured ballast using the following process which worked very well for me.
Firstly, I ran some wood glue along the cork roadbed that extended about 6-7mm out from the sleepers. Then, I dropped a small amount of ballast onto the glue and let it dry hard. This gave me a fixed edge to my trackbed. When that was set, I carefully dropped small amounts of ballast outside of the rails and along the inside, making sure that I didn't drop too much and rubbing my finger along the sleepers to get all of the ballast down between them. A quick spray with water that has a small amount of washing up liquid in it, to break the surface tension, and then I used a dropper to drop a 50% water/50% Titebond glue (you can use normal PVA but I have lots of this American woodworking glue around) that I had dyed dark with an amount of Vallejo black polyurethane primer. This gives a nice mottled effect of dirt and grime building up over the years.


Firstly, I ran some wood glue along the cork roadbed that extended about 6-7mm out from the sleepers. Then, I dropped a small amount of ballast onto the glue and let it dry hard. This gave me a fixed edge to my trackbed. When that was set, I carefully dropped small amounts of ballast outside of the rails and along the inside, making sure that I didn't drop too much and rubbing my finger along the sleepers to get all of the ballast down between them. A quick spray with water that has a small amount of washing up liquid in it, to break the surface tension, and then I used a dropper to drop a 50% water/50% Titebond glue (you can use normal PVA but I have lots of this American woodworking glue around) that I had dyed dark with an amount of Vallejo black polyurethane primer. This gives a nice mottled effect of dirt and grime building up over the years.

I am still left with a little clearing up of the stray bits but it looks good to me.
The next task was to get some coal staithes and an engine shed onto the layout.
The coal staithes were made out of Starbucks type wooded stirrers that I had picked up from somewhere. I have a NWSL Chopper II which made short work of cutting the bits to width and length. (You do have to keep your fingers away from the razor blade though:-). Once glued up, they were sanded down to get all the excess glue off the surface, otherwise the stain wouldn't have taken properly. These things are made from old railway sleepers so that set the size of each component. I firstly stained them with some matt black primer and then dry brushed some dark brown on the top.

I have some coal to go in these. When set up with a couple of workers, some sacks and a barrow, it should look great.
My next task was to make the Knightwing Engine Shed. I didn't realise that this was a click together kit and only comprised 7 parts. I was all set for a couple of evening putting this together but within 10 minutes it was done. The interesting bit was the painting. Firstly, I airbrushed the brickwork with some Lifecolor terracotta paint from their British Western Desert paint set. I then masked all the concrete off and hand painted that with some Vallejo Buff, ensuring that some of the background came through to make it look like dirty concrete. I hand painted the window frames with the same buff paint. Lastly, I used some Vallejo Acrylic White Filler and spread this all over the brickwork. Some very hard rubbing and lots of wet cloth wiping resulted in just the mortar lines being highlighted. I airbrushed the roof with Vallejo Model Air Dark Sea Grey, added some airbrushed light green to look like moss on the slates and then went over the whole thing with Lifecolor Tesocrom Smoke to get the effect of all the coal smoke from the steam engines around. I was planning to take this to IPMS Clacton on Thursday night as it is a plastic kit but I realised that I would have to complete all four walls. As one side and the back will be against the wall and no-one will see them, I cheated and left those two unfinished! Naughty but time saving.

Lastly, I have set the Metcalfe Small Station in place on its platform base. I gave the whole of this a good going over with Tensocrom Smoke so it doesn't look all clean and pristine.

None of the buildings have been set into the groundwork yet.
My next step is to complete the base of the goods yard by covering it with crushed cinders.
I am having second thoughts about automating all of the points because I am finding that, even having set up macros for all the combinations, it is still more fiddly than moving the points by hand. I also make fewer mistakes. Using DCC, if you make the wrong point adjustment and then start the engine, you don't really have time to reset a point correctly so you have to stop the loco. As I do this all the time, I find that being able to correct the problem using the "big pointy thing from the sky" is a better solutions. It seems that I might have 9 point motors and 5 Digitrax Accessory Decoders to dispose off :-(. Normally, I am a big fan of DCC but not for everything on a small layout.
That's about all for now. Next time, I will be discussing Kadee couplers and plans for an extension to the railway giving me a whole new station!
David
Sunday, 2 June 2013
Now we are moving on - at last
I spent the last two weeks doing quite a lot with the railway.


Next step is to start laying down some ground effects. I will do the Goods Yard first. This will be mostly cinders. Once, done, I will put some ballast in place that and see how we go about toning it all down. Should be good fun!
- I installed point motors on the fiddle yard along with a Digitrax accessory decoder board. This means that every single point is now operated via the DCC controller.
- I have created a list of NCE Macros that manage all the combination point movements. I still have to remember them all, though.
- I have painted the baseboard black as an undercoat - it still needs one more coat.
- I have painted the rails with a rust mix.
- I have painted the Peco sleepers with a combination of black and greys to tone down the shiny surface of the sleepers.
- I have fitted every item of rolling stock with Kadee couplers. I couldn't stand the complexities of the tension lock type. Now I can easily uncouple wagons with a small screwdriver and I can lift a wagon out without disturbing everything else.
- I have spent this last weekend making my first Metcalfe card kit. The Small stone station.


Next step is to start laying down some ground effects. I will do the Goods Yard first. This will be mostly cinders. Once, done, I will put some ballast in place that and see how we go about toning it all down. Should be good fun!
Wednesday, 8 May 2013
The track is down and the wiring is in place
I have laid all the track, wired up the underneath and now have everything tied together so that I can run trains. Here is a patched panorama of the layout.

Here is a shot of underneath the left hand board.
.jpg)
This shows how I do my DCC power bus. I use self adhesive copper tape to run both sides of the bus. That makes it very easy to tie the track onto it. (Double click on the photo for a larger image) I used to use tinned copper wire for the droppers as there was no stripping of insulation. However, once you drop it down through the track, you don't know which side of the track it is connected to. This meant that I had to drop one side, turn the board over; solder that side up; turn the board back; drop the other side - and so on. I now use red and black hook-up wire so I can do both side and use the colour to tell me where to solder to the bus. The three PC boards you can see are part of my DCC set up. The one on the left is the connecting board for the NCE controller whilst the two to the right are Digitrax Accessory decoders. These is used to drive the point motors. They are very cost effective because they come with two connections and only cost £16.50 from my friend Kevin at Coastal DCC. Not only are his prices great but he lives 5 minutes from me so it is very convenient.
These decoders are especially efficient when you need to operate two points at the same time. Each of the two channels can operate a pair of Peco point motors. Hence, my runaround, which has a pair of points at each end, only requires a single channel for each. Brilliant.

You may notice that all of a sudden I have an NCE controller. What happened to the Digitrax Zephyr. Well, I didn't like having a fixed control point. The thinking goes like this. I can buy a Digitrax Full Feature Super Throttle for £130 and add it to my existing Zephyr or I can buy an NCE PowerCab for £130 and sell the Zephyr on EBay (I should get about £110) leaving me a net £20 out of pocket. Job Done. I am a bit fingers and thumbs with it but I am sure that it will be fine once I have familiarised myself with its options, etc.
I am busy acquiring Locos (I have three now), coaches (I have two) and goods wagons (I have a half a dozen). I am busy at the moment getting hold of some deleted 6 wheel milk wagons and some Peco Wonderful Wagon UD Milk tanker kits.
Next step is to paint the back scenes with my airbrush.
Friday, 26 April 2013
Ellerby Branch track laying
The station is to be named Ellerby after a kind relative that I had never heard of who left me some money in her will. She deserves some thanks.
Firstly, here is the track plan that I am working to.
 I have changed my mind about the track. Due to some silly circumstances, I ended up using the normal Code 100 track (all because one coach had coarse wheels - and it turns out I won't be using that coach!).
I am laying the track on a bed of cork which I am sticking down using a wonderfully named product - Gloop! This is a special adhesive specially formulated for sticking plastic card to wood. It works brilliantly with one flaw. Get it on your hands and it is the devil to get off. I have spent two days with sticky fingers (wasn't that the name of a pop group?).
Here is the status so far.


I am having to go to the shop every day to pick up a bit more track. Each time I do, I pick up some more goods wagons so i am slowly building up my stock.
More tomorrow. I have to update the track plan as I have added an extra siding in the goods yard.
Firstly, here is the track plan that I am working to.
I am laying the track on a bed of cork which I am sticking down using a wonderfully named product - Gloop! This is a special adhesive specially formulated for sticking plastic card to wood. It works brilliantly with one flaw. Get it on your hands and it is the devil to get off. I have spent two days with sticky fingers (wasn't that the name of a pop group?).
Here is the status so far.
I am trying to keep the three boards as separate entities so that I can dismantle them for wiring underneath, etc. To show how this works, this is the join between the right hand board and the fiddle yard.
The track ends have been soldered to pieces of printed circuit board so that they don't get damaged when split.
I did find one enormous flaw. I saw a nice LNER/BR train in a special offer at Scograil. It comprised an N2 loco and two teak coaches and was celebrating the Olympics - the train in the set being from the 1948 Olympics. As you can see, the fiddle yard isn't long enough for this simple train to clear the point. Mind you, the fiddle yard board was built for N Scale train lengths.
One of the first tasks this weekend is to add another 20" on this board to give both lines plenty of capacity.
I am having to go to the shop every day to pick up a bit more track. Each time I do, I pick up some more goods wagons so i am slowly building up my stock.
More tomorrow. I have to update the track plan as I have added an extra siding in the goods yard.
Monday, 22 April 2013
Goodbye SNE
I have to tell you that the Sunset North Eastern is no more! Did I hear a big Ahhhhhh - no, well I am not surprised. Firstly, a little background. I have mostly been developing US outline model railroads through most of my life with very occasional excursions into British outline. This is not strictly true because I have rarely developed the ideas and the collection of rolling stock etc. into a working model railroad. I did get one railroad together a couple of years ago and got that to the scenic stage but I had to destroy that as we moved house and it was pretty tightly built into the room. I won't make that mistake again.
Once we had moved, I started on a new SNE but got a bit sidetracked. I have recently retired and, in the early days, I was feeling a bit useless and under-worked so I came up with the idea of writing a freight car routing app for the iPad. This would have an iPad front end and a web back end. I got a lot of the back end written and had done a proof of concept for the iPad. I was very concerned about the complexities of the routing software and kept putting off starting that. In the meantime, I added to the complexity of the railroad I built in our new apartment just so that I could cover all bases with the app.
Just recently, I have been updating my photography software that I wrote 10 years ago and found that some images didn't conform to the standard EXIF specification. I spent 7 days of 6 hours a day struggling to resolve this and after getting not very far, decided that this wasn't something I wanted to spend my retirement doing. This put the iPad app in total jeopardy and finally, I decided that I would stop work on it. This put a very complex railroad at risk of demolition and I finally decided to do that.
One of my problems when designing layouts is that I always want to include everything that the prototype has, so my layouts tend to be very complex. I have decided that I am not going to make that mistake again. Hence, I have rebuilt the baseboards with the intention of building a very simple OO - 4mm to the foot - British Railways based small terminus sometime in the late 1940s. I have started gathering appropriate locos and stock - based at the moment on the part of BR that came from the London North Eastern Railway. This has an advantage in that I have very little experience of full scale US railroads - having only travelled from Windsor Locks CT to New York on about three occasions, but I can clearly remember life in the late 40s and early 50s.
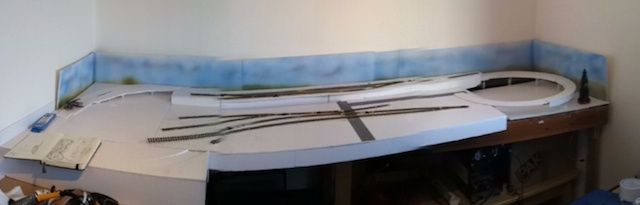
I am also going to lay the track using Peco fine scale code 75 track so that this will look a lot better than the code 100 I was using. Here is a photo of the baseboards in place.
.jpg)
It comprises of 3 boards: 60" x 18", 38" x 20" widening out to 28" and a fiddle yard of 36" x 8".
It is totally free standing and will be completed as three separate boards so that I can take it down and move it if necessary. All of my US stock and track is now on EBay and I have an approved budget for the BR stuff. Additionally, I have a really great local model railway shop - Scograil - where previously I had to get most of my stuff from the US and shipping and import costs were very high.
I will keep you up to date with much more regular postings.
BTW, I have a new blog where I put out a daily view of life on the Ipswich Waterfront - www.waterfrontblog.co.uk. Check it out and sign up to follow it.
David
Once we had moved, I started on a new SNE but got a bit sidetracked. I have recently retired and, in the early days, I was feeling a bit useless and under-worked so I came up with the idea of writing a freight car routing app for the iPad. This would have an iPad front end and a web back end. I got a lot of the back end written and had done a proof of concept for the iPad. I was very concerned about the complexities of the routing software and kept putting off starting that. In the meantime, I added to the complexity of the railroad I built in our new apartment just so that I could cover all bases with the app.
Just recently, I have been updating my photography software that I wrote 10 years ago and found that some images didn't conform to the standard EXIF specification. I spent 7 days of 6 hours a day struggling to resolve this and after getting not very far, decided that this wasn't something I wanted to spend my retirement doing. This put the iPad app in total jeopardy and finally, I decided that I would stop work on it. This put a very complex railroad at risk of demolition and I finally decided to do that.
One of my problems when designing layouts is that I always want to include everything that the prototype has, so my layouts tend to be very complex. I have decided that I am not going to make that mistake again. Hence, I have rebuilt the baseboards with the intention of building a very simple OO - 4mm to the foot - British Railways based small terminus sometime in the late 1940s. I have started gathering appropriate locos and stock - based at the moment on the part of BR that came from the London North Eastern Railway. This has an advantage in that I have very little experience of full scale US railroads - having only travelled from Windsor Locks CT to New York on about three occasions, but I can clearly remember life in the late 40s and early 50s.
I am also going to lay the track using Peco fine scale code 75 track so that this will look a lot better than the code 100 I was using. Here is a photo of the baseboards in place.
It is totally free standing and will be completed as three separate boards so that I can take it down and move it if necessary. All of my US stock and track is now on EBay and I have an approved budget for the BR stuff. Additionally, I have a really great local model railway shop - Scograil - where previously I had to get most of my stuff from the US and shipping and import costs were very high.
I will keep you up to date with much more regular postings.
BTW, I have a new blog where I put out a daily view of life on the Ipswich Waterfront - www.waterfrontblog.co.uk. Check it out and sign up to follow it.
David
Friday, 22 February 2013
A tour around the Sunset North Eastern Railroad
Here is my N Scale layout ready to roll. The track has all been tested and the DCC electrics are all OK. A few trains have been run to test the track layout and some changes have been made to ease the running in the industrial area of Webster. What I don't explain in the video is that the staging area (which is normally stored away so I can use the room) is what we refer to as Sunset. Being that the railroad is the Sunset North Eastern, one would expect Sunset to be a major centre for the railroad and would be too large to model.
Thursday, 14 February 2013
Oh Blast - just when I thought the budget was spent!
Yesterday, my N Scale Bachmann RS3 ran away. The only way I could stop it was to turn the power off to the track. Fortunately my Digitrax Zephyr has a button for that. Unfortunately, when I turned the power on, the loco was dead. Now I have two feelings about this. One is that, having told the wife that I didn't need anything else for the railroad, I now have to admit to needing a new decoder. The second is pleasure that I am replacing the decoder as the built in Bachman decoder is quite limited and the loco never ran very well.
As you can't get a drop in board for this loco, I am looking at the TCS M1 Miniature decoder - details here: http://bit.ly/XashQm.
Kevin at Coastal DCC has these in stock so I should be back and running with it soon.
As you can't get a drop in board for this loco, I am looking at the TCS M1 Miniature decoder - details here: http://bit.ly/XashQm.
Kevin at Coastal DCC has these in stock so I should be back and running with it soon.
Sunday, 3 February 2013
The SNE is back up in the new apartment
Well here it is in its new home. I have added some painted back scene for two reasons.
1. It looks better and
2. It stops me marking the walls when I do the scenery.
The back scene is not brilliant - I am no artist, but it gives a bit of a feeling of an overcast day, I hope - grin.
The small board on the left of the layout is portable. It has some dowels for location and would normally have a clamp to tighten it to the main board. It is purely a staging area. I will probably give it some minimal scenicking so it doesn't look too out of place.
Monday, 21 January 2013
It worked!
We knew we had to move sometime before June as we had only taken this apartment on a temporary basis. Hence, I built the baseboards so that I could break them down easily. Most of the rail joins were done by soldering the rail end to some printed circuit board. Two of the joins were a bit tricky. One was on a curve and the other on a grade so I tacked these down so that I could take them up easily. Here is the railroad ready to go.

Subscribe to:
Comments (Atom)