I have managed to complete all of the trackbed gradients, laid all of the track and converted the Sunset Yard, which was my main board until recently, into a terminus off the new board. As you can see, the new main board comprises two complete loops of the board, which is 6' x 2' 6" ( equivalent of 12 x 5 in HO. These two loops are connected by a single crossover which means that there is only one route from the Sunset Yard through to the staging, which will connect to the main track on the extreme left of the main board. The train will be able to travel around both loops as many times as the timetable requires. There are three stations on the way, all with their own set of industries. One of these does not have a runaround so each industry can only be switched in one direction (there is a reason for this that will become clear sometime next year).
This is a DCC controlled layout so needs a power bus installed underneath. To do this, I use self adhesive copper tape. I then install droppers, using tinned copper wire, from the track to the bus. I install the droppers one side at a time. I lay out all of the locations for droppers on the board and on a drawing and mark them up as A and B. I then drill all of the dropper holes and install droppers just on one side. I tick off each dropper as I solder it to make sure that I don't miss any.
As I have had problems before in getting dead areas or shorts, I install the droppers onto the bus one side at a time. As I will be working with the board upside down, I won't be able to check as I go along so it is important to have a clear check afterwards.
Well here are the shots of the two boards ready to be taken down to install the "A" side droppers. For the keen ones amongst you, there is a YouTube video here.
You Tube Video
An ongoing description of the trials and tribulations of building a model railway. I am not one to worry too much about 100% accuracy. If it looks right then it probably is right for me.
Sunday, 30 December 2012
Friday, 21 December 2012
All of the gradients are now in place
As you can see from the photos, I have now laid down all of the track supports. It all looks a bit nasty and untidy but it is all that a small N-Scale layout needs and it will all be covered up anyway. The plan to start everything from the middle seems to have worked. I laid down the wooden board along the front of the board and that established a level pretty much in-between the baseboard and the highest I needed to give track clearance over another track. This has had the effect of reducing the gradients required down to around 2 - 2 1/2% which is really good on a layout this size. I have had steeper grades before and they always give a bit of trouble. Next step, over the weekend, is to start laying some track.
Tuesday, 18 December 2012
Deciding on the track layout for the new board
I have been thinking about what I want from the new main board for my railroad. I have been working on, as you would say in the USA - or at least John Armstrong used to say - my givens and druthers. These come out as follows:
Anyway, this is where I am at:
- Must have two separate loops around so that I can run two trains whilst I am switching in the main yard.
- Must be, ultimately, end to end.
- Must have two towns for Way Freight operations
Anyway, this is where I am at:
Saturday, 15 December 2012
Both boards are now up
As you can see, I have fitted the previous board to the new one. There is a discrepancy of height between them. The new addition is set higher than the main board as there will be two levels on the track and by starting in the middle, I can make the resulting grades less than if I had everything starting at the lower level.
The existing of scene staging is a board 3' x 8". This will be added along the front of the main board. This will give me a proper end to end option rather than an out-and-back style.
Friday, 14 December 2012
Next baseboard gets made
I was going to finish off the current board before we move and make the main board once we were in our new apartment. We have to be gone by June next year so that seemed a plan. However, I have been thinking about what the next board may be and found that I would have to change the existing boards. Thus I decided that it didn't make much difference when I made the new board.
So I have got on with it. The overall plan is make a new board that is 6' by 2'6" and attach the existing board to it as a terminus. I was intending to do away with the current fiddle yard ( or staging as you call it in the USA). However, I saw how I could meld it all into a single layout.
I will set out the track plan over the next couple of days but in the meantime, here are a couple of photos of the board under construction. As we are in rented accommodation, we can't attach anything to the walls so I have to be careful how I build it to be stable. The answer was to set the board onto an existing table. I have made the framework so that there is an inside run of framing that holds onto the table top to secure it in place. I have then extended the top outside of that with extra framing. As it happens, we bought a new bed frame the other day so I had all the wood from the old bed which included the two main side frames and all the slats from under the mattress. This wood all came in very handy.
Firstly, here is the photo of the framing underneath.
And here is the photo showing the framing all covered in with 6mm MDF
So I have got on with it. The overall plan is make a new board that is 6' by 2'6" and attach the existing board to it as a terminus. I was intending to do away with the current fiddle yard ( or staging as you call it in the USA). However, I saw how I could meld it all into a single layout.
I will set out the track plan over the next couple of days but in the meantime, here are a couple of photos of the board under construction. As we are in rented accommodation, we can't attach anything to the walls so I have to be careful how I build it to be stable. The answer was to set the board onto an existing table. I have made the framework so that there is an inside run of framing that holds onto the table top to secure it in place. I have then extended the top outside of that with extra framing. As it happens, we bought a new bed frame the other day so I had all the wood from the old bed which included the two main side frames and all the slats from under the mattress. This wood all came in very handy.
Firstly, here is the photo of the framing underneath.
And here is the photo showing the framing all covered in with 6mm MDF
Thursday, 29 November 2012
Final cut of the corporate identity
Well after lots of effort and jiggery pokery, I finally have all of my freight cars branded as, I think, they should be. I went for SNRD as a reporting mark for the reefers and I have also re branded the hopper cars. I have to have a small extra go at renumbering the hopper cars as they all have the same number. I did the reefer changes using the white decal sheet with the red printed on it. I did the hopper car finishing touches by using the white sheet but putting the white SNE lettering on the left hand end onto a black square. Once they were matt varnished, the black outline didn't show.
Here is the whole train - it looks very good to my eyes and is good enough for me.
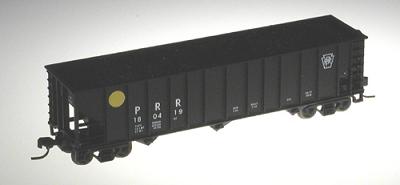
These are the hopper cars - these started out as PRR hoppers with the PRR logo, PRR reporting mark on the left and an orange ball in the top left hand corner. This is how they started out:
and this is how they look now:
and finally, the reefers:
If you really want to see them, warts and all, then double click on any image for a larger version.
Hope you like them because I do.
Here is the whole train - it looks very good to my eyes and is good enough for me.
These are the hopper cars - these started out as PRR hoppers with the PRR logo, PRR reporting mark on the left and an orange ball in the top left hand corner. This is how they started out:
and this is how they look now:
and finally, the reefers:
If you really want to see them, warts and all, then double click on any image for a larger version.
Hope you like them because I do.
Tuesday, 13 November 2012
Reefers get the corporate treatment
In our supposed Sunset North eastern, one of the main industries is a meat processors called 'Easter Meat Packers'. This is a railroad owned company so should be in some sort of alignment with corporate branding!. I did look up EMPX but that was taken along wth EMPY so I have gone for the EMPZ reporting mark.
These two are decalled up using the laser printed decal sheet. Didn't need the white underlay on these! The red came through really well.
Don't forget that this in N Scale so this is all tiny stuff!
These two are decalled up using the laser printed decal sheet. Didn't need the white underlay on these! The red came through really well.
Don't forget that this in N Scale so this is all tiny stuff!
Subscribe to:
Posts (Atom)